OK, so I am a hypocrite. I will spend big bucks on suspension revalving, but sure as heck wont spend it on a tool. A good example is a fork oil measuring tool. Racetech will happily sell one to me for $129 USD, but heck – NO WAY!
Anyways I built one out of a hunk of aluminum, a rigid brake line and a syringe.
The essence is a piece of aluminum that sits on to of the fork. It has a hole at its centre for the rebound damper shaft. There an offset hole for the rigid brake line. The brake line is what determines the depth of the oil level, to I added a set screw to secure it in place. A hose to a syringe and all it is done.
Setting sag for the front forks is somewhat easy. Put on a zip tie,snug it to the lowest travel and then sit on the bike. However – for the back – it always takes someone with a tape measure to do the measuring. Well, my wife got tired of being my helper, so I built a tool to replace her. (Shhh!)
OK here is Donny’s version of the “Sag Master”.
Using a bolt, and old hatchback lift support (gas strut), a clamp and a zip tie, I gots me a a precise sag measuring tool I can use by myself anytime I want.
First of all, you will need to get a gas strut and release the gas pressure. So extend the strut and drill 1/8″ hole about an inch from the end. The gas will spurt out quickly, so wear eye protection. Then another hole up close to the shaft. When complete the shaft should move easily. Here is a video… (all the excitement is at 0:41)
Next, on the end of the shaft, bolt a C clamp. I happily drilled a hole through the C clamp and used a wing nut.
On the other end of the strut I pressed on a 1/2″ tube (AKA beat the tube on with a hammer). On this tube I drilled a hole for a bolt, which happened to be the same diameter as the hole in my bike axle.
Put a zip tie on the shaft and viola, you now have your own sag master. Put the bolt end in the axle, clamp the C clamp to the fender. Slip the zip tie down to the cylinder and sit on the bike.
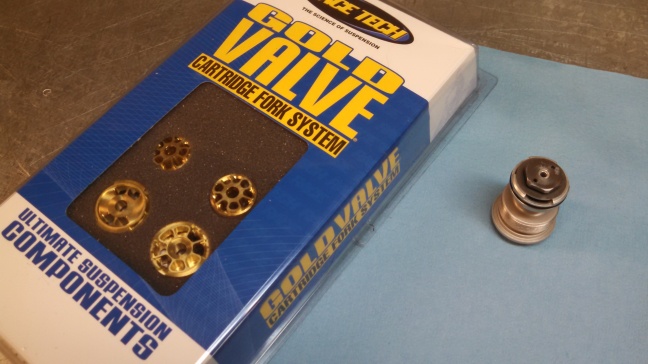
Installing RaceTech Gold Valves on the KTM Freeride 350. Thanks to a buddy who has figured out a valving stack that is a “magic carpet ride”, I decided to give it a go.
The old rebound/midvalve…
The old compression valve…
The new rebound/mid gold valve and shim stack
The new compression gold valve. Scroll down for a video.
Here is the shim stack I put in. Goal is for a plush ride on technical trails. Not worried about jumps or whoops.
RaceTech G2-R compression Valve
Restrictor stack
(2) 12 X 0.15
(2) 12 X 0.10 Comp Low
(2) 24 X 0.10 Crossover
12 X 0.10 Comp Hi
24 X 0.10
19 X 0.10
17 X 0.10
14 X 0.10
13 X 0.10
12 X 0.10
11 X 0.10 Mid valve
(3) 20 X 0.10
16 X 0.10
12 X 0.10
11 X 0.10
17 X 0.20
Float 0.6
Rebound
(3) 20 X 0.10
12 X 0.10
18 X 0.10
16 X 0.10
14 X 0.10
12 X 0.10
10 X 0.10
There is a 1.2mm bleed into the side of a rebound port
There are a variety of ways to tune motorcycle suspension:
run it on a test track and make a change at a time
pay the bucks and get a professional to set it up
go onto the internet and see what everyone else is using
purchase a data acquisition system and measure what is going on
just wing it
ride for 30 years, all the time fiddling with suspension until you “get it”
shoot a video of your riding on a test section.
I decided to go with option 7, here is why:
I really dont know what I am “feeling” when I am riding – am I low in the stroke? blowing through the midvalve? Too much compression or to much rebound? I have no clue.
I have had my suspension revalved and setup on many bikes by top professionals. It has been Hit and miss – really!
Other people on the internet (a) dont know what they are talking about (b) dont know my riding style (c) dont know my bike. In other words – how the hell could they possibly advise me on how to setup my suspension?
A DAQ is expensive and takes a long while to analyse the data
Winging is it winging. Guess and “by golly – it doesn’t work” is the norm.
I cant turn back time to start riding at a younger age to learn suspension by trial and error.
Video analysis, I can run my test, the way I ride. I can see what the suspension is doing. I can repeat the test dozens of times and compare the results. I can show it to others and they can help me to understand what is going on. It is “relatively” inexpensive.
The GoPro Black is the only GoPro that shoots at 240 frames per second, in 720p resolution. The back is great for framing and reviewing the scene. The remote is great for triggering right from the bike.
The Analysis Software
For analysis software I use the free Kinovea software from Kinovea.org. This software allows me to move through frame by frame, automatically plot motion paths, compare two different test runs and produce analysis videos.
The Test
This is one of the difficult things to determine when trying to test your suspension setup – what do you test? For me, I mostly ride technical trails in 2nd gear. Most of my objects at this speed are rounded and 4-6″ big (logs and glacier/river rock). So for my test ride, I chose to ride on the flats in 2nd gear over a 4″ log and see how the suspension reacts. You will need to figure what is your typical test. Perhaps it is a few things: jumps, whoops, etc.
Videotaping the Run
A few things when videotaping:
make sure the camera is perpendicular and aligned to the centre of the axles on the bike. This will make it possible to do accurate measurements from the video.
Mark the front fork with inch markings – this will help you analyze how much suspension is being used.
Mark with big and bright tape the centre of each axle
Mark with big and bright tape the top of the forks (at the triple clamp) and the back of the bike at the fender.
Use the same speed on each test run
I use the remote to trigger the video, it makes it easier than sorting through a lot of footage.
For each test run, make sure you write everything down:
front/rear compression and rebound settings
air pressure in tires
valving, oil and oil height
test condition
Analyzing the Result
With Kinova I do the following:
load the video, set the “working zone” to the bike just entering the video, and exiting
set the speed to 1%
use “track path” to mark the frame position and the axle position
you can also load two videos, synchronize them and compare results.
This is the second hard part. Trying to figure out what is wrong and what can you do to correct it. I use a couple of key concepts to guide me:
the bike should be level and never feel a bump.
the tires should always be on the ground.
wheels bouncing is not good
This is “ideal” and never reality. But it is a good goal to shoot for.
In my video below, I notice a few things.
1. the front fork moves up a few of inches, then it starts to force the frame up. This means my midvalve compression is too stiff.
2. the tires compress a lot, I should have more air pressure.
Got myself a little Chinese tire durometer from dx.com. Measurements varied widely from side to centre and from test to test. So I took ten readings each tire and calculated an average. I dont this can be used for absolute measurements but for relative measurements in the same environment with the same temp settings it’s is somewhat useful.
I tested most of my dirt bike tires, got some interesting results:
Michelin X11
Trials
Rear
57
Maxxis Trailmax
Hybrid
Rear
53
GT 216X
Knobby
Rear
55
Pirelli MT43
Trials
Rear
67
Michelin Starcross
Knobby
Front
79
Michelin Trials Front
Trials
Front
52
Michelin S12
Knobby
Front
78
Michelin M12 XC
Knobby
Front
88
I thought the Mich X11 trials tire would be softer than the the rest of them, Interesting. However, the soft carcass of the Mich X11 combined with the soft tire leads to its amazing traction. The TrailMaxx is quite soft, but it has a heavy carcass.
Also, I noticed the starcross was much softer than the M12 XC. This explains part of why the starcross feels a bit less skiddish up front.
So I am adding durometer to the “best traction” equation. Along with tread pattern, carcass structure/stiffness and air pressure.
A number of the KTM 2008 EXCR bikes had a manufacturing flaw: the auto-decompression cam was backwards. This made starting *very* hard. This killed batteries quick, and wore out the leg very fast.
Anyways, when I was replacing the cam with the proper one, I though I would put a video together of how the decompression cam works.